The “Blog” function is included with all new CMS websites installed by Redback Graphics. Rather than calling it a blog, you might utilise it’s function to promote products, services and events, which in hand, will greatly increase your SEO ranking for all of the information you include in those “posts”.
By using “posts” a user can quickly promote an item, service or event, and that is automatically archived for future reference, while keeping current content fresh and updated regularly.
Website “pages” (ie Home, About, Contact etc) can easily be updated, but once updated the old information is lost. By using “posts”, old posts remain archived and accessible to visitors and Search Engine Ranking, while new posts add to the information within your website and keep it active.
- Google likes websites that are updated regularly. It will gradually ignore websites that are not updated as there is no new information to index and your site will slowly drop down the search results.
- People are searching for particular “strings” (sentences, words or groups of words), your challenge is to INCLUDE those strings within your website content.
- DONT over-use strings, words or phrases that you think Google will find. Google will find, and Google will black-list your site.
- Use RELEVANT, DESCRIPTIVE information.
- Include your location (at very least on your contact page), but it would be beneficial if included throughout your website content (dont over-use).
- Make sure you include descriptive Titles with all images inserted into pages or posts.
- Adding an image with a descriptive, informative title is an easy way to make your site more interesting both to your readers, and to Google.
Write your first post
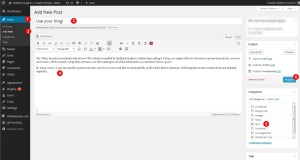
 Login to your dashboard, on the left, choose Posts, see pic (1), Add New (2). Give it a title just as you would a new page (3), add some content (4), choose (or add a new) category (on the right, mid screen (5), choose multiple categories if the post is relevant to multiple categories, then hit the blue “Publish” (6) button on the right. You can also edit the date it was published (top right corner, “Published”), and add a featured image that will display when readers view archives of posts. Set the featured image via link bottom right corner, choose “Set featured image”, find a picture relevant, upload it, choose “Set featured Image” button bottom right, and then “Update” the post.